
.png)
Lemax DIY Lighting Hack
- sissyinseattlemerr
- Mar 11, 2025
- 5 min read
While perusing the vibrant and engaging Facebook Lemax Collecting pages, we stumbled upon a truly genius idea that has the potential to transform your Lemax table accents that are currently unlit into captivating focal points of your holiday displays. This innovative concept was graciously shared by the talented Hallie Farrell, who has provided a fantastic DIY hack to light up those charming Lemax pieces that lack built-in illumination. By incorporating this method, you can enhance the visual appeal of your village scenes, creating a warm and inviting atmosphere that draws in the eye and captivates the imagination. However, it is important to note that any alterations made to Lemax products will void your warranty, so it is crucial to proceed with caution and consider the implications of your modifications. With that said, read on to discover how you can elevate your village by illuminating your beloved village pieces, adding not only light but also life to your displays. This enhancement can truly bring a new dimension to your holiday village, allowing each piece to shine in its own unique way, and create a magical ambiance that will delight both you and your guests.


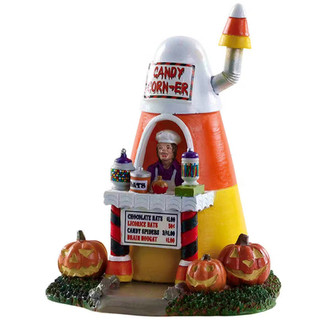


Let's first take a closer look at the before and after gallery showcased above. The first two images prominently feature the Lemax Spooky Town table accent known as Creepy Confections, designated as Stock #83349. This particular piece has garnered a significant amount of attention and admiration since it was introduced to the Lemax line in 2018. Its charming design encapsulates the whimsical spirit of Halloween, making it a favorite among collectors and enthusiasts alike. However, despite its undeniable cuteness and fun appeal, there is an element that feels somewhat lacking. The Creepy Confections piece, while delightful, tends to get overshadowed and somewhat hidden when placed within the larger context of a bustling Lemax Spooky Town village display. It truly deserves to stand out and shine on its own, showcasing its unique character and charm. Now, let’s turn our attention to the gallery images that follow the DIY operation where a light-up feature was successfully integrated into this beloved piece. The transformation is nothing short of remarkable! The addition of a mini color-changing LED light has taken this already adorable accent and elevated it to a level of cuteness that is simply off the charts. The vibrant colors and gentle illumination breathe new life into the Creepy Confections, allowing it to capture attention and enchant anyone who lays eyes on it. The way the light interacts with the various details of the piece enhances its visual appeal, making it an eye-catching focal point in any Halloween display. If you’re inspired by this transformation and eager to learn how to achieve similar results with your own Lemax village, follow my detailed guide below. I will provide step-by-step instructions, along with tips and tricks to help you successfully add a light-up feature to your own Creepy Confections or any other piece in your collection. Remember this DIY is not limited to Spooky Town pieces! This DIY project not only enhances the aesthetic of your decorations but also brings a sense of personal touch and creativity to your holiday displays. Get ready to bring your Lemax Spooky Town or winter-themed village to life in a whole new way!

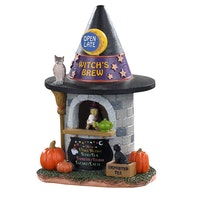
Before we dive in to the how-to's of illuminating your Lemax table accents I wanted to give a shout out to Hallie Farrell and show her adorable Spooky Town Witch's Brew all lit-up! You can visit the FB group to see more from collectors https://www.facebook.com/groups/880410245858955/ Ok let's begin.
Tools needed
Drill
Various sized drill bits from 11/64 up to 3/8
Flat head screwdriver
A strong grip or a table vice-grip if you have one
LED mini lights (See product links below for the varying types you can purchase)


Step 1
Find and purchase the LED mini lights you wish to use. I purchased 3 different styles from amazon. See the links below. They range from a small compact metal housing style to a larger plastic design. What I have found so far is the option for coloring is either solid colors (red, blue, purple, green, yellow, clear), or a color-changing LED. I prefer the color-changing, but you might prefer a solid color. Pricing vary from .30 to .65 cents each. The links below are just a small sampling of what is available. Find the ones that will work best for you and your budget. Once you have them in hand you are ready to go! LED Mini Light Amazon Links: Color Changing:
https://a.co/d/g2geDsC 20 Pcs Miniature Led Lights,Tiny Lights for Hand Craft,Miniature Lights Battery Powered, Dollhouse Lights,Paper Lantern Birthday Party Indoor Outdoor Decoration Supplies (Multi-color Changing)


Solid Colors:
https://a.co/d/7J04ei8 Mudder LED Balloon Lights Mini Battery Powered LED Lights Bulbs for Paper Lantern Balloon Wedding Christmas Halloween Thanksgiving Party Decoration Centerpieces(Colorful Light,50 Pieces)


Solid Clear:
https://a.co/d/3iZAXxQ LIHAO 24PCS Battery Operated Light Bulbs LED Balloon Lights Mini LED Lights for Paper Lanterns Party Decoration, Christmas Village Lights Waterproof (White)


Step 2
When it comes to selecting the perfect Lemax Village pieces to illuminate, it’s essential to consider not only the aesthetic appeal but also how these charming accents will enhance the overall ambiance of your Lemax holiday village display. The selection process can be quite enjoyable, as there are numerous delightful options to choose from. I will share a few specific items that I have personally earmarked for my collection this year, which are sure to bring a warm glow and festive cheer to any setting. Additionally, I encourage you to explore the gallery below, where you can find a variety of inspiring ideas that may spark your creativity and help you envision how these pieces can come together in your own unique village display. It’s worth mentioning that we proudly carry all of these enchanting table accents in our curated collection, available for purchase, ensuring that you can easily find and acquire the table-top pieces that resonate with your holiday spirit. Whether you are drawn to quaint cottages, whimsical shops, or festive figurines, each item is crafted with meticulous attention to detail, making them a wonderful addition to your holiday village.


Step 3 Begin the process by marking a small X in pencil on the spot where you intend to drill your hole, ensuring you avoid any figures or items inside the table accent. Start with a small drill bit and gradually increase the size. Avoid using the largest bit initially, as it can damage the resin and potentially ruin your piece. Hold the Lemax piece firmly by the base while drilling. Smaller bits are relatively easy to manage, but as you progress to larger bits, it becomes more challenging to maintain a grip on the item. This poses a risk; if you lose control, the Lemax piece might fly out of your hand. Always wear safety glasses and consider using a vice if you're worried about injury. In the example with Creepy Confections, the largest bit used was 3/8", although a 1/2" would have been ideal, it was difficult to manage without a vice grip. Instead, smaller bits were used, working up to the 3/8 and moving it around the sides to gradually enlarge the hole. Once the hole is the desired size, gently insert the LED, leaving it exposed enough to turn on. Avoid pushing it too far in, as it could get jammed inside the table accent, making it very difficult to remove. The type of LEDs you use will determine how far in to insert them. Twist-on, twist-off LEDs need to remain exposed enough to operate, while those with a black toggle switch can be inserted further. The hole should be just the right size to hold the LED securely; too loose and it will fall out, too tight and you won't be able to remove it if needed.
Please comment below if you have suggestions or comments to this subject. We would like to know what has worked for you and what hasn't. Are there other LEDs you have found that work terrifically? Enjoy the little video of the finished product below.


Thanks for sharing. Do I have permission to post a link to this article in a group?